
The beginner’s guide to sourdough
There’s nothing quite as comforting as the tangy aroma of sourdough bread baking to golden, crispy perfection—especially when you’ve crafted it yourself from scratch, starting with an all-natural starter. With a little preparation and patience, homemade sourdough can quickly become the star of your table. This blog, along with its companion recipes, offers tips and tricks for producing bakery-quality artisanal loaves that are simple, low-maintenance, and perfect for any household.
Baking bread can feel daunting at first, but it’s a journey worth taking—and well within reach, even for beginners.
Before you begin, take a moment to read through the recipe from start to finish, gather your tools and ingredients, and trust your instincts. Soon, you’ll be turning out sourdough loaves that are beautifully crusty on the outside, tender on the inside, and perfect for everything from sandwiches to soups—or simply enjoyed warm from the oven with a generous pat of butter.
And remember: every baker learns by doing, so don’t hesitate to eat your mistakes!
Ready to get started? Let’s bake!

First Things First: Creating the Sourdough Starter
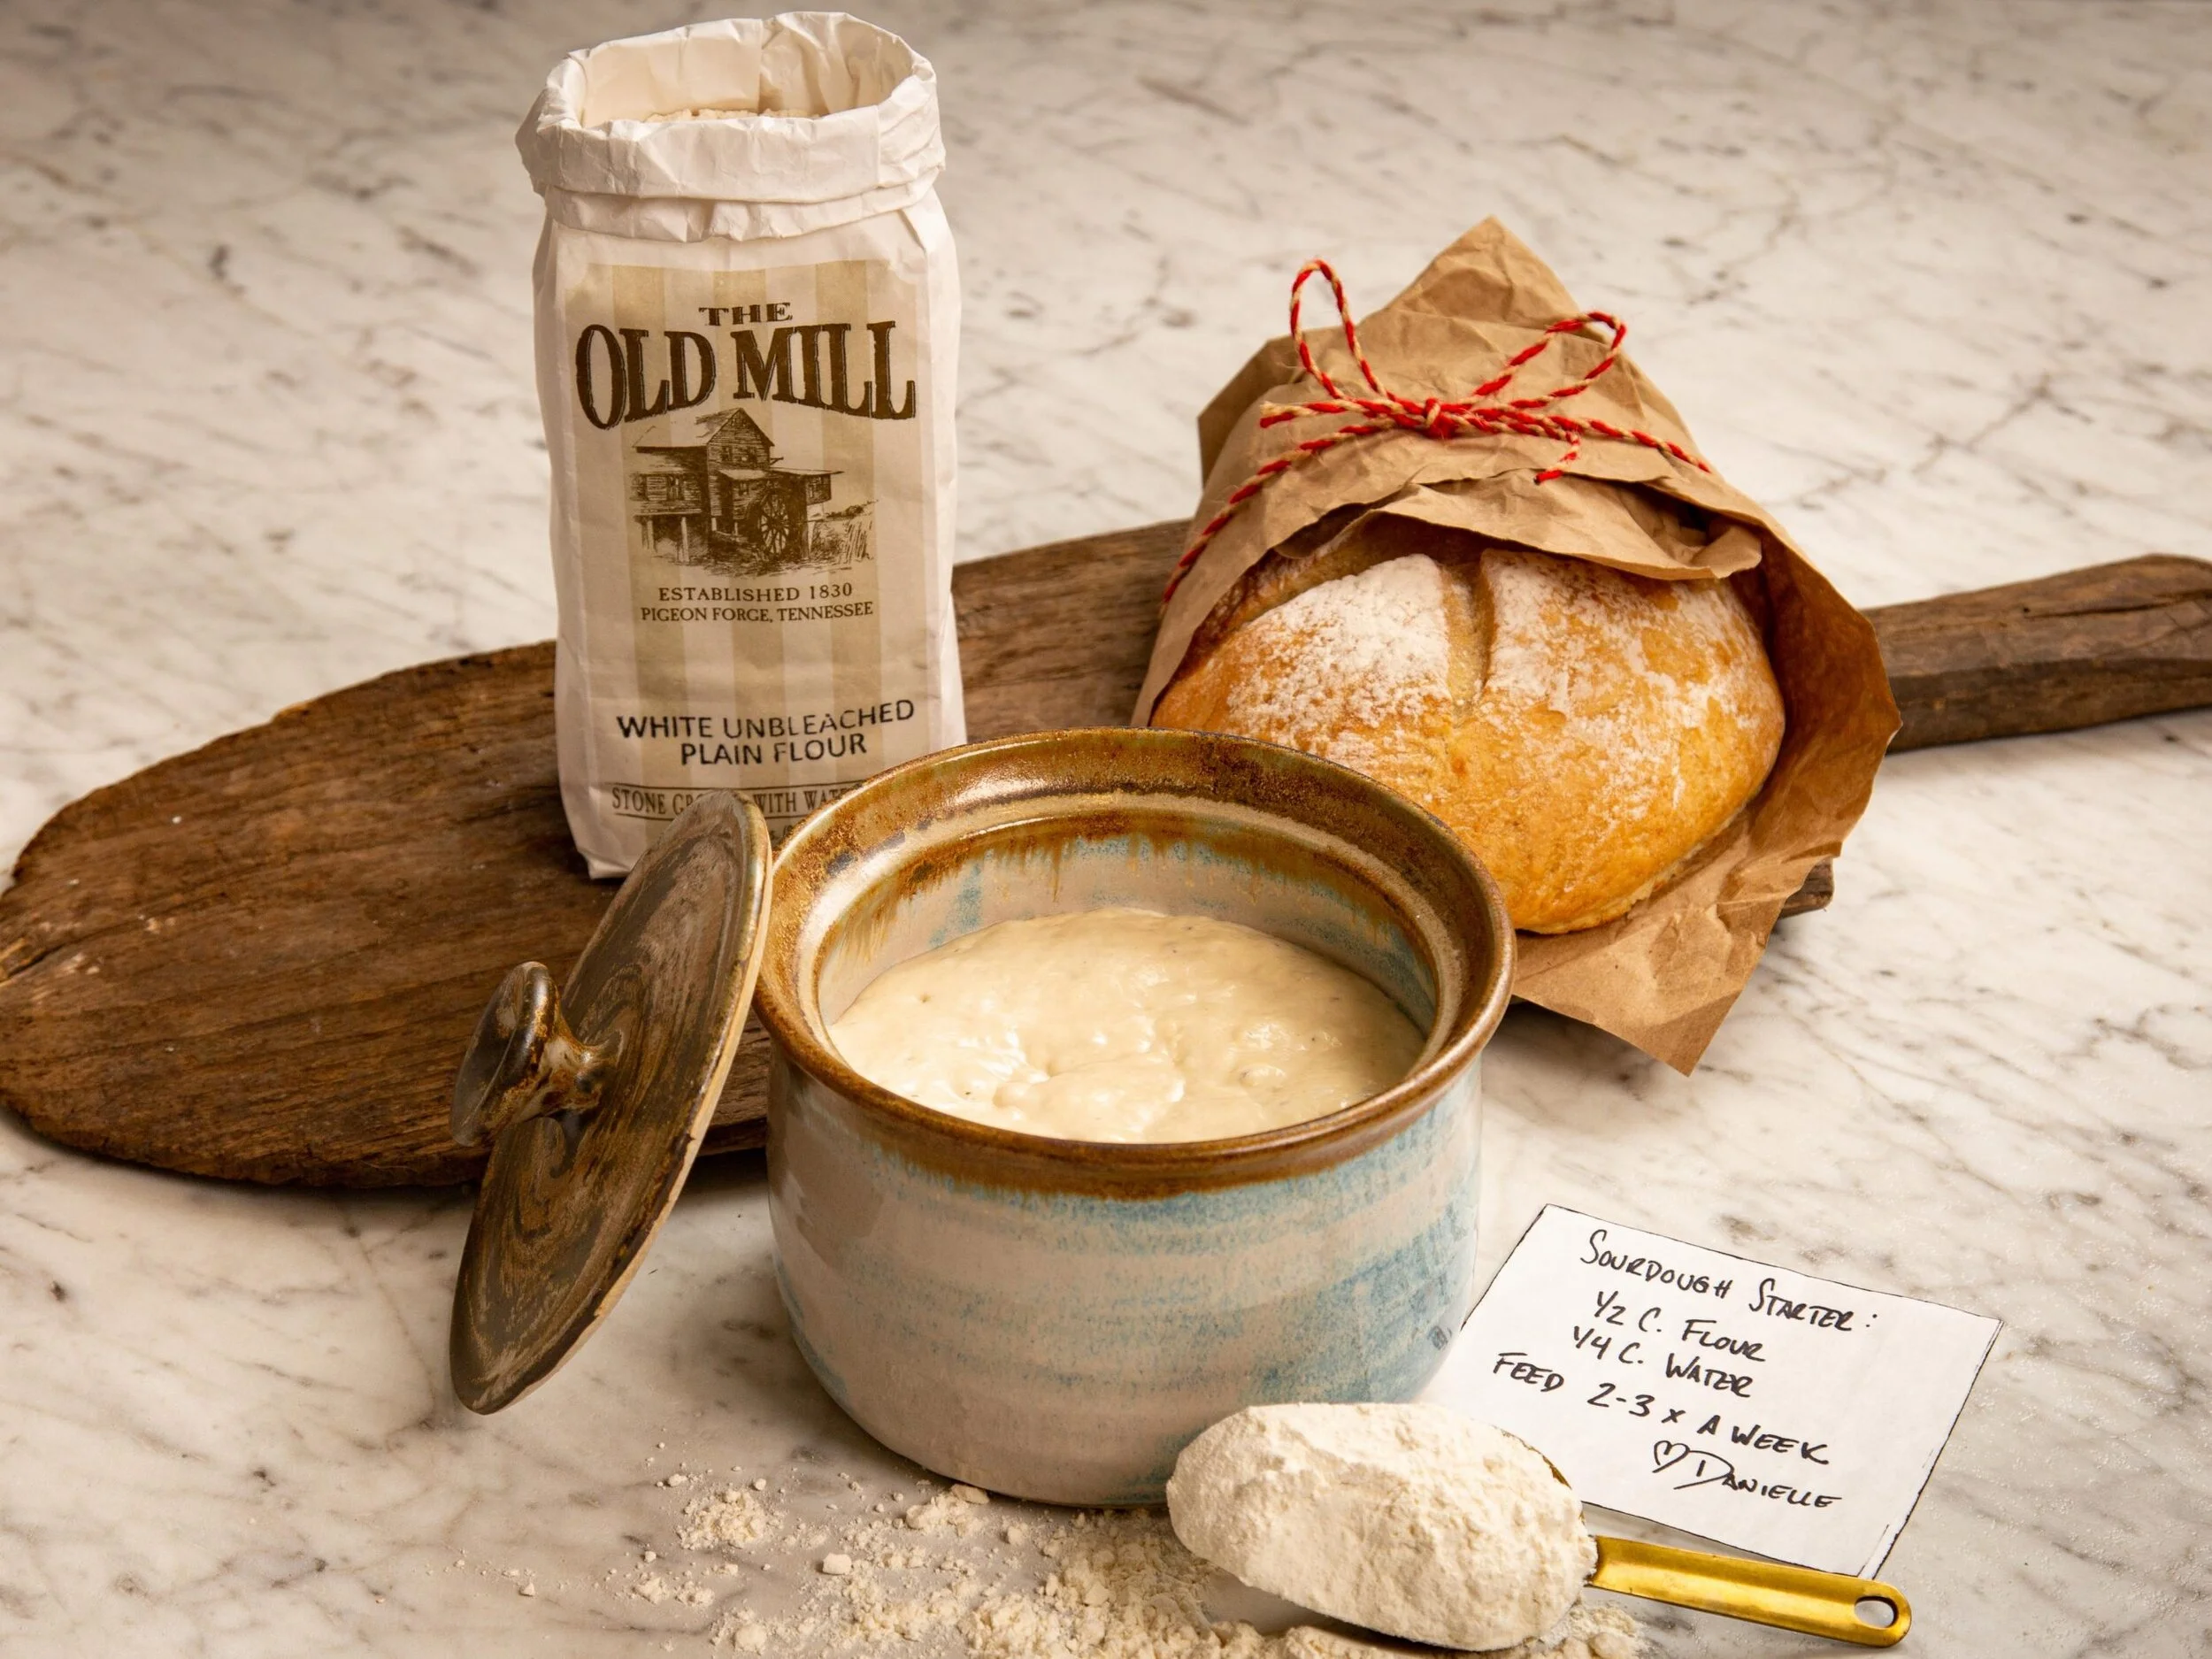
The foundation of any good bread starts with sourdough starter. Think of sourdough starter as nature’s own yeast, rather than using commercial yeast in bread. To create your starter, you will need a container with a loose-fitting lid, flour, and water. We’ve made the first step even easier with our Sourdough Starter Kit.
What is a sourdough starter?
Sourdough starter is mixture of flour and water, that is left to sit. As it sits, it creates its own wild yeast by fermenting the flour and water. This natural yeast will create the rise that you need for your bread, eliminating the need for commercial yeast.
How to create a sourdough starter:
You will feed your starter at 2:1 ratio, two parts flour to one-part water. You can increase the amount of starter if you will be doing a baking, or you can decrease just to maintain your starter as long as you stay in the 2:1 ratio.
Developing a sourdough starter takes about 7 days before your bread is strong enough to raise a loaf of bread on its own.
The all-purpose flour you probably already have on hand works well as a starter, and what we use most often for the sake of convenience. But feel free to switch things up with other kinds of flours. Wild yeast is particularly potent in whole grain flours. A portion of Rye Flour or Whole Wheat Flour cut in with your all-purpose flour will make your starter stronger than ever.
Each day, you’ll need to discard half of the sourdough starter, then feed the remaining starter with equal amounts of flour and water. Once the starter is developed, you can begin using part of the starter in recipes rather than tossing it. (And you can gift your friends with any extras!)
When your starter begins to expand and show bubbles, you’ll know the starter is developing, and it is becoming active. Therefore, a container to house your starter with a loose-fitting lid is important. A loose-fitting lid will allow gases to escape the container, making our Pigeon River Pottery Jar a functional vessel.
The colder your home, the slower your starter will develop. The wild yeast will develop quicker at warmer temperatures (70 to 80 degrees). If your starter is slow-moving, try placing it in a sunny spot in the kitchen or on top of the refrigerator.
Click here for step by step instructions on creating your sourdough starter

Maintaining Your Sourdough Starter
A frequent baker can keep the developed starter dough at room temperature and maintain feedings at 2-3 times a week. If you plan to bake less often, keep your developed starter in the refrigerator. If storing in the fridge, feed once a week by discarding half the starter and adding ½ cup of flour with ¼ cup of water.
If refrigerating, pull the starter out about 8 hours before you intend to mix your sourdough bread dough. Feed the starter and let the starter come to room temperature, so it is active and bubbly for your bread recipe. A cold starter will make for a long rise time for your bread dough.

Sourdough Starter Trouble Shooting
If you see any liquid sitting at the top of your starter, it is time to feed it! You can either drain the liquid out, or stir it in. If this happens frequently, you should feed the starter more often than you are.
Your developed starter should smell boozy and tangy, with a little bit of sweetness. If your starter begins to smell foul, bacteria has gotten into your sourdough container. Discard starter and start over.
If your starter should discolor, or mold on the surface, we advise you begin a new starter. Pink discoloration is a telltale sign your sourdough has gone to long without feeding or been contaminated. This is rare, but something to watch out for.
Now that you have a healthy sourdough starter, it’s time to make some dough. Our test kitchens have created two easy sourdough bread recipes. Our no-knead sourdough bread allows you to mix it and forget. Increased sourdough starter helps the bread to rise quickly, meaning hot and fresh bread ready in 4-6 hours.
The artisanal sourdough bread recipe requires a little more time, but the exceptional taste and texture it produces is oh so worth it! During the first few hours after mixing, you will perform a series of simple stretches and folds to develop gluten in the bread. From there, it goes to the refrigerator overnight (or during the day) to let the flavors develop and the dough continue to rise. Ready to enjoy within 18-24 hours.

Sourdough Bread Baking Tips and Tricks
No matter what flour you use in your starter, bread flour is crucial for bread baking. Due to its high protein content, typically 12-14%, bread flour will give your sourdough its desired rise, and allow it to rise upward instead of outward.
When measuring your ingredients, be precise. The best method for measuring your flour is to spoon it into your measuring cup and level if off. Scooping the flour can pack it into the measuring cup, making your finished bread dense and heavy.
Don’t rush the rise time! Many factors can affect how quickly your bread will rise or double in size, such as the warmth of your home or if the dough is resting in sunlight. Our favorite spot is on top of the refrigerator, covered to prevent drafts. Your dough may rise slower or faster than what we outline in our recipes due to these circumstances.
You will know your bread is ready for the oven by performing the “Poke Test”. Lightly flour your index finger and gently poke the dough. If it springs back right away, your dough needs more time to rest. If it slowly springs back and leaves a slight indent, this means gas production in the dough has slowed and it is almost ready for the oven. Once it hits the oven’s heat, it will continue to expand.
Before placing your bread in the oven, it must be scored with a sharp knife or razor. Not only does this add a beautiful design to the top of your bread, it also allows the gases to escape during baking. Without scoring, your bread could crack along the surface. Scoring allows you to control the area the gases escape.
For bread that’s crusty on the outside and tender on the inside, high heat and steam are imperative. A Dutch oven with a lid is our favorite vessel for creating this environment. Steam builds inside while the bread bakes, keeping the crust soft during the first few minutes of baking and allowing the natural yeasts in the bread to have one more push in its expansion, called “oven spring”. It will also give you a shiny, crisp crust at the end of baking.
No Dutch oven? No problem. You can create steam but putting a medium baking dish on the bottom of the oven. Right before you place your loaf of bread in the oven, pour a cup of water in the baking pan. Do not remove the baking pan from the oven to add the water so the steam stays in the oven, be careful during this step.
A cast iron skillet works great in replacement of a Dutch Oven, just cover the top tightly with aluminum foil to keep the moisture in. We used this method in our No-Knead Sourdough Bread Recipe. You will still need the bottom pan of water in the oven with this method.
Find a baking schedule that works for you! Whether you are baking on the weekends to enjoy your loaves during the week or are looking for a fresh loaf for the supper table, a little planning will go a long way. Determining when you want your bread ready will let you know if you want to mix your dough in the morning or evening, or if you need to choose a faster alternative like our No-Knead Sourdough Bread.